The latest in the SoundWorks Collection sound profile series features Junkie XL (Tom Holkenborg) discussing his work on the new film , Black Mass, and also how he made the transition from doing dance music to film scores. Holkenborg is best known for his electronic dance music, but has also been involved with film scoring for over a decade, creating scores for Dutch films, collaborating with Hans Zimmer on The Dark Night Rises and other films, and scoring the blockbusters Divergent and Mad Max: Fury Road.
Junkie XL shared this photo from his studio, and it’s pretty clear what he’s addicted to: modular synths. While Junkie XL ( Tom Holkenborg ) is best known for his dance music work, but in recent years has developed a second career in film scoring. He’s collaborated with Hans Zimmer on The Dark Knight Rises, Inception and other films; and scored 300: Rise Of Empire; Divergent, Mad Max: Fury Road and Black Mass.
Holkenborg is featured in a new interview at Grantland that looks at he made the transition from making electronica records to scoring blockbuster films:“If you talk to other film composers and to people who work in the industry, the fact that you’re an original, talented musician is a given fact,” says Holkenborg.“What is left then? It’s, how are you as a person in a room? Do you deliver on time? Do you make the movie better? Do you understand what the director wants? Can you walk that really fine line of politics when things get sour and you help solve the problem? If you have a good handle on that, you might become a successful composer.”
Tim Green has been releasing emotive dance music for a good decade now, on labels like Dirtybird and Cocoon. He’s built up a strong set-up in that time, not just in terms of his studio but the way it’s organised, with various synths, arpeggiators and even a MIDI drum running into Logic. Just look at the way he works on this video – we bet even his Mac desktop is immaculate.
In my opinion, music production is a learning process that never stops. There are always new tips to try out, new tools to get to grips with and new ways of approaching the art of making music. Whilst the natural reaction to this is perhaps frustration, dig a little deeper and you’ll discover an exciting world of possibilities, where there is no set way to do things - all doors are open.
Alongside the vast helpings of online tutorials to aid your learning (including amongst the pages of this magazine), I find that exploring the workflows of others can often have a direct impact on how I make music. It is for exactly this reason that I love watching interviews with my favourite music producers, as typically I come away with a trick or an idea that I’d never thought about before.
Today, I’d like to share 10 such nuggets of music production wisdom with you, taken from video interviews with a number of the finest music producers from across the spectrum of electronic music. The advice shared ranges from the directly practical to the more philosophical, both areas of which I think are incredibly important to nurture in the development of your music production technique. So, whether you’re carving out a niche in the Dance world or pumping your energy into Hip Hop, I hope you’ll find plenty of inspiration below. Dive in and enjoy!
Four Tet: EQ with Care
In this Pro Tools walkthrough of two tracks taken from his album,
There Is Love In You, Four Tet describes how he achieves his signature warm, organic sound. Defying conventional wisdom that plugins and analog hardware are the route to achieving such a sound, Four Tet calmly reveals that he simply makes sure not to EQ out too much of the spectrum on individual tracks.
Of course, this depends on the sounds and samples you are working with having desirable frequencies in them to begin with, but being careful about what you remove from your sound is worthy advice indeed!
RJD2: Create Richer Drums with Copy & Paste
Hip Hop producer RJD2 shares his top tip for creating a chunkier kick sound in this video. His technique goes something like this: find a sample you want to work with as your kick, copy it, transpose the pitch down, low pass filter the sound, crank up the resonance and mix back in with your original sound. Simplicity itself!
RJD2’s trick works wonders in adding a rich, phat quality to his sound in minutes. Be sure to try this one out on other drum sounds too, from snares and claps to hats and toms.
Kirk Degiorgio: Subtle Processing Can Have a Big Impact
UK Dance music legend Kirk Degiorgio is a heavyweight in the world of music production. Here, Kirk treats us to a DAW walkthrough of one of his tracks, demonstrating the effectiveness that light applications of processing can have - in this case, compression on a drum track.
An easy mistake to make as a beginner producer is to assume that piling on the plugins and cranking the processing will automatically make everything sound better. Kirk shows us in this video that applying only 1 - 2 dB of gain reduction can have a big impact on the excitement and energy present in a track. Genius!
Kode9: Start with Something Simple
Beginning a new track can often be the most frustrating point in the journey towards a completed production. In this Ableton roundtable discussion, Hyperdub label boss, academic and producer Kode9 unveils his top tip for getting around the terrifying ’blank screen’ roadblock - begin with a sample and build your tune up around it. I’ve never absorbed advice so simple and effective since!
Carl Craig: Pay Attention to Your Sub Bass
Making sure your kick sound has a nice punch at around 100 - 120Hz is pretty essential in creating a satisfying drum track. However, Detroit Techno legend Carl Craig reminds us in this interview that the sub is often what really matters, both in your productions and in the club.
Taking an EQ and applying a subtle boost to your kick (or ‘foot’, as Carl logically terms the sound) at anywhere from 60 - 100 Hz to bring out that ‘boom’ can work wonders for a track - making sure the right frequency is enhanced is vital, however (check out my tutorial on finding a kick drum’s fundamental frequency for a more in-depth look at this technique).
J Dilla: Produce When You Feel Inspired
J Dilla is still the king of Hip Hop production for many and his music continues to inspire and educate years after his untimely death. In this rare video interview, he discusses a wide range of subjects with infectious enthusiasm, such as his motivations for making music.
The interview is peppered with inspiring words for producers but my favourite is, once again, wonderfully simple - don’t force your creations and produce when the mood takes you. Long-live J Dilla’s influence!
Robert Henke: Your Limitations Can Set You Free
Dub Techno legend Robert Henke is as celebrated for his co-creation of the Ableton Live DAW as he is for his excellent music. As with many of the producers featured in this list, just about every interview he has ever given is packed full of useful advice for music makers of all kinds but in this video, he shares a tip I have often found especially useful - limit yourself in the studio.
If you’ve ever found yourself in the exasperating situation of being unhappy with a track and throwing layer after layer of sound into the mix in the hope of improving things, this tip is for you! Begin with a small number of elements and add only when and if necessary. Priceless!
Madlib: Influence Can Be Drawn From All Music
You could spend all day watching practical tips on production, sound design and mixing, and never come close to the level of wisdom imparted by Madlib in this interview. His much-loved Hip Hop sound is an unashamedly eclectic and far-reaching mix of flavours, borrowing samples and ideas from just about every genre under the sun.
In talking about the sorts of music he might play out at a live show, Madlib here shares something I think all creative people can take inspiration from - take your influences from everywhere. Whilst Heavy Metal and Jazz might seem totally incompatible at first listen, given the right treatment fuzzy guitars can sit quite happily alongside a smooth, brushed drum groove. Madlib’s music gives us the compelling evidence that this production philosophy is a profoundly fruitful one.
Gold Panda: Don’t Overthink Your Arrangements
An excellent tip for those who struggle with finishing tunes (I’m right there with you folks!), UK producer Gold Panda discusses his refreshingly brisk approach to arranging music. Rather than spending hours tweaking every node of every automation curve, Gold Panda takes the view that following your instincts and paying respect to tried and tested song structures gets the job done just as well. Whilst I think there’s a time and a place for tweaking to perfection, I can see how treating your song as successive looped sequences will leave you with a near-finished track most of the time. Suddenly there’s so much more time for the next tune - thanks Gold Panda!
Flying Lotus: Embrace the Chaos!
My final selection is a tip from one of my all-time favourite producers, Flying Lotus. The prolific producer’s work has touched on Hip Hop, Jazz, Chiptune, Beats and even Prog Rock, so he sure knows a thing or two about getting work done!
In this interview, FlyLo reveals that his Ableton Live sessions are often very messy as his goal is to get the song finished, not create neat and tidy projects. Finding the right workflow for you is what matters above all else, but if you find that you’re spending more time colour-coding regions than making music then I hope FlyLo’s words will spring quickly to mind.
“… the picnics are encouraging more synth heads to take their gear outdoors and experience patching in different environments …”
Since early 2015 Bana Haffar and Eric Cheslak, both self-confessed nature junkies, have been hosting public outdoor modular synthesiser meet-ups in Los Angeles going by the name of ‘Modular On The Spot’.
As the modular synth heads amongst you will already know, there are two loose strands of modular synthesis philosophy – dubbed ‘east coast’ and ‘west coast’ – associated with some of the fundamental design choices made by the two earliest commercial modular pioneers, Bob Moog and Don Buchla, the most notable being Buchla’s decision not to correlate his control voltage scheme to traditional European musical scales in contrast to Bob Moog’s 1 volt per octave design. Buchla’s choice was an intentional bid for artistic freedom: he created a unique aesthetic born diectly out of his involvement with San Francisco’s famous mid-twentieth century counterculture. I’m glad to say Modular On The Spot is not only west coast in its geography, it’s staying true to that west coast spirit too. Delving into the history of the movement for documentary film I Dream Of Wires, San Francisco Tape Music Centre founder Ramon Sender remembers the effect 1960s
open-air tape music happenings had at the time, “Out in the middle of an orchard, to hear
these strange sounds emerging … I think it was a kind of mind-blowing experience for a lot of people who heard the Buchla out there in that setting.” A willingness to recontextualise these sounds away from the usual studio setting and instead encourage people to experience and create them outside is a core philosophy for the pair. The timing couldn’t be better: the explosion in popularity of the new more compact Eurorack-style modules has meant both greater physical portability (no longer are systems limited to being wall-sized behemoths bolted to the floor in academic institutions) and an ever greater pool of people interested in getting together to swap notes about their own set-ups. The modular synth landscape is a highly social, naturally collaborative place; internet forums for discussion and invention already keep people company on their personal tactile journeys into sound discovery, and in this way the scene has been quietly evolving independent of the music industry at large. Tapping into this kind of organic, DIY spirit is the Modular on the Spot concept, which I first came across when I spied a photo of Twin Braids playing their synths in a park – pure Hardware in the Wild style. I realised it was my duty to fly to
America via the internet, track down the people responsible, and find out everything I could about it:
LY: Hi Eric and Bana, first off what prompted you to recontextualise your sounds by taking them outside the studio?
EC: It started when I was on a photo trip to Arizona [Cheslak is a skate photographer] and had a system with me. Bana came out to meet up and go camping and we decided to find
an offgrid campsite and jam out our time in the desert. [Pictured third from top]
BH: Yeah, I think we were both craving a new, richer creative experience. I wanted a change from the sterile, static studio environment that electronic instruments typically live in. I wanted to experience what it would be like to create in a dynamic outdoor natural setting.
LY: How do you power and amplify the synths when you’re not near mains electricity?
EC: I have a Honda EU2000i generator and some QSC K10s.
LY: How do you hear what you’re doing when there’s a meet? I notice speakers in one shot but I notice headphones in others – and do you sync up different people’s synths at the meet with each other so they’re in time, or are you all playing separately in your own worlds?
EC: So again we use my generator and speakers, some people fine tune their patch on headphones then play through the speakers when it’s their turn to play. We haven’t synced up yet because we keep the picnics down to 2 hours time to avoid being busted if possible!
BH: I find synth meets to be somewhat hellish. Everyone usually ends up blasting their systems at the same time. Each station should have its own set of headphones.
LY: How do the synths respond to being outside? Are there any mods or bits of kit you need? I like the suitcases
BH: I’d like to believe that these instruments have a sort of consciousness of their own. Much in the same way that being outdoors changes my approach to patching, perhaps it changes the way the synths process control voltages.
EC: To me I don’t think it bothers them. I think they like it. I’m very sure they don’t like rain though.
LY: Your modular picnics seem to have a decent number of attendees. Is it new to those people to be taking their gear outside?
BH: I think so. These instruments aren’t cheap so most people opt to keep them safe in the studio. I think the picnics are encouraging more synth heads to take their gear outdoors and experience patching in different environments.
EC: The turnouts have been good, we’re pleased, yeah, this is a new adventure for them and for us. It’s not normal to want to play a modular outside where it’s exposed.
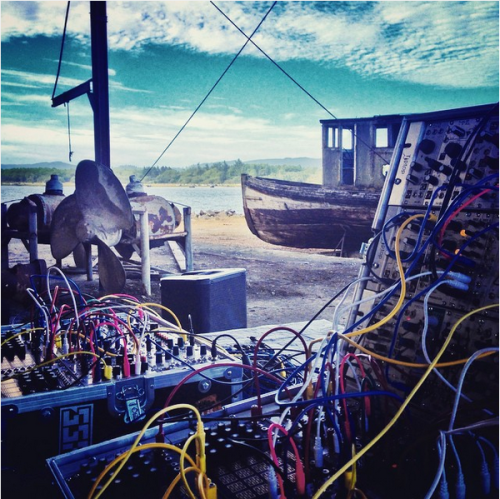
LY: I love the shot in the boatyard – so atmospheric – can you tell me any more about how you came to be there and what you were doing that day? [pictured top]
EC: Bana and I were on vacation driving up the Oregon coast looking for spots to camp and spots to jam. We were driving through Coos Bay Oregon looking along the bay for places to set up and we came across this abandoned shipbuilding yard and knew it was the place. We carried all the gear in and set up. We jammed for about two hours and were about to record when a bewildered security guard showed up and asked us to leave. We asked for more time but were denied so we had to pack up.
BH: Yeah, we randomly came across this abandoned shipyard and instantly knew we had to do something in that space. That’s when we really got sparked to make Modular on the Spot a thing.
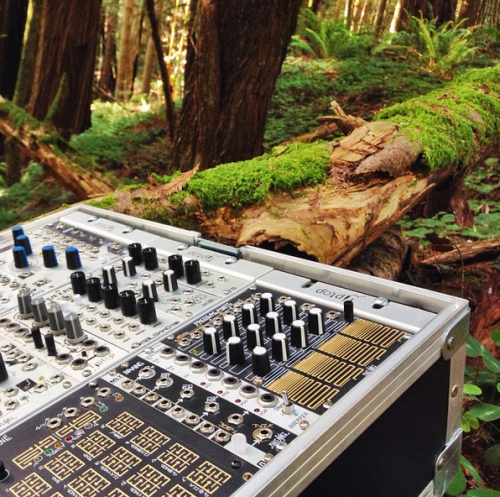
LY: Also the shot in the woods is so lovely – are you recording out there? [pictured second from top]
BH: That was such a cool setting to patch in. There’s some thing amazing about sitting on a bed of moss in the middle of a forest with a modular synthesizer and speaker. It was a surreal, rich, grounding, and inspirational experience. EC: We were just still driving up the coast looking for places to jam, hike, and explore. A local tipped us off about that spot, the setting was magical. It was a perfect bed of moss for us to sit on and play. We felt that we were just adding to nature. We did record out there but we still have to figure out what to do with that recording.
LY: Thank you both so much for answering my questions and letting me repost these photos, I love your vibe!
BH: Thanks for taking interest in our weird little world Loula, I hope to meet you in person some day!
So there you have it: Pacific coast, expect a visit
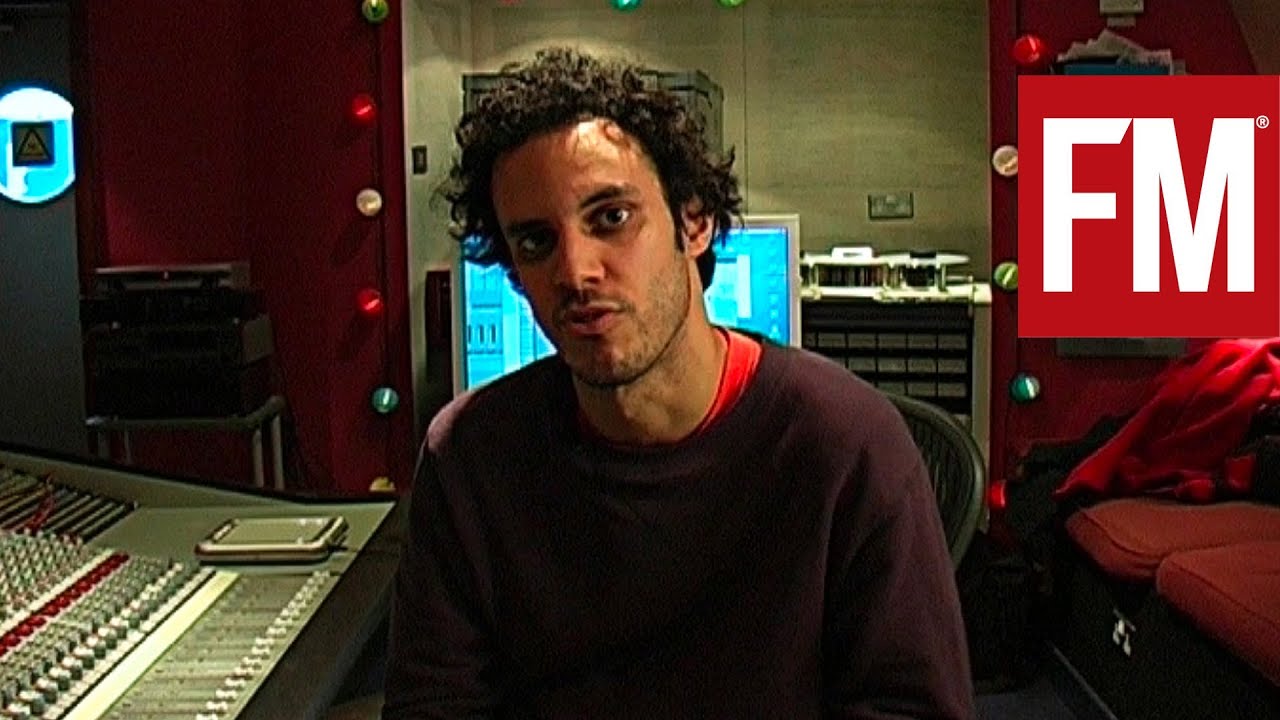
"Praveen Sharma has been making music, both solo and with projects like Sepalcure (his duo with Machinedrum) for over a decade, but settled into a groove with his Braile alias in recent years, honing a take on house and garage that’s high on melody and rich atmosphere.
On his Against the Clock we get an insight into how real Braille makes his music sound: as well as using piano and outboard synthesisers on the track, he samples himself hitting a glass, dropping drumsticks and more."
Another awesome video, with commentary as he goes along on what he’s doing. Very inspiring.
Record the music, drums and sub separately and cut the low end from the drums and music so nothing is interfering with the sub bass. Then sidechaining etc. use a filter with resonance to shake it up a bit
just experiment with different methods. Sometimes a processed sine wave can be ideal. For other tracks try a decent quality 808 sample. Also stand in different positions in your room when listening back to what you’ve made. I find this a good way of getting an idea of whether the sub is sitting right in the mix.
Use a square or square/triangle. Low pass it. Use an pitch envelope with fast attack and quick decay so it has more punch. Set synth to monophonic. Cut out anything below 35-40hz, and make a little resonant bump on the lowest fundamental. Use a bit of compression slow attack and fast release but make sure you listen for the best point to set them. Touch of saturation. Maybe boost low end a bit with a nice sounding eq. Then you can also fuck around with more pitch envelopes, legato, glide etc.
IMO everything except the kick should be rolled off below 100hz. When you’re making your bass whatever saw/square etc you use, make sure you roll that off too about 80-100. Then that leaves loads of room for your sub to sit and just fill the fuck out of that range, side chain it or LFO tool it to your kick so it just lets that punch through.
To make my subs it’s just a straight sine wave with a very quick pitch envelope to give it a punchy pang at the start of each hit. Mono it, give it a touch of distortion and that’s kind of it to be honest. Then just make sure you group it with your mid bass and get some compression on that group to gel the two together.
Layer sine waves at different pitches/octaves… simple & effective.
Getting the sub right can be difficult not least because it seems to vary a lot on different systems, and if you aren’t using headphones or a treated room, nodes can cancel out big chunks of the frequency range. I would say being conservative with levels is important as is picking a sub/bass that compliments the kick. Using tricks to make clashing frequencies sit together probably isn’t the most successful answer. I would check for nodes in your room by playing back some test tones, the quieter ones means cancellation is happening. If the room is ok then think about the sonics of the kick, the notes that are being used for the sub and if they really can match. If they can then careful use of levels and eq should be enough. Maybe working with the sub in audio will give you more fine control of levels. The other thing is if they are even placed well musically, if you have just thrown in sub because it needs it then maybe think more about the sub being an instrument in it’s own right.
sample the sub of your favorite song and put that sample on loop on a separate track, dont worry if the start n finish sync up because sub is magic ear glue and it doesnt need to be clean. next put a compressor on that track and very loud, then eq so its below human hearing range.
EQ and compression and the softest-curved distortion you can find. Sub-bass with presence is subtly distorted, you would think that it would be one of the easier sounds to nail since the end result has only 3 or 4 harmonics but balancing out the distortion and EQ takes a bit of practice.
An 808 with the sharp attack low-passed is an old jungle trick and IMO still remains to be about the best source for subbass you can get.
For a synth patch, start with a ramp or square, set the filter’s keyboard-follow to 1 and adjust the heavily resonated cutoff right on the first or second harmonic. Use envelopes to give this sound an attack
the attack transient for subbass contributes greatly towards its presence, which is part of what makes the 808 such a potent subbass.
Yeh like matey said above for a post-production trick to get a clearer sub-band - if you can be bothered to do it - do a steep filter cut at around 100, then trace whatever your bass is doing with an un-effected pure sine or low-passed saw, or pwm-square (or whatever fits) with a slight attack on each note-hit (fading in).
After you do that, add heavily gated 808 kick-pops whenever there’s a strong kick drum. (Either tune the kick-pop noise away from whatever notes the baseline plays, or stitch-them-in with sidechaining or sliced fade-curves).
Big systems prefer un-saturated clean sinewaves for sub bass. You’re just trying to move air as efficiently as possible there. The room and bass bin itself takes care of the acoustic properties of your sub, (usually in a badly un-even way). The less clutter and un-eveness down there the clearer it will translate through a bass bin.
HiFi and headphones and other small speakers prefer more closed-saw or pwm-square types of rumbles as you’re dealing with much smaller drivers that barely have any travel in them anyway. Saturation or other accoustic treatments might give it the appearance of it being louder or make it more audible on small speakers, or just get it to gel with the original track.
IMO everything except the kick should be rolled off below 100hz. Number one important thing for bass is getting everything else out of the way.
If I am spinning my wheels on music writing, I’ll practice sound design and save the patches if they turn out fly as fuck. Typically I save them with names like FM Sub 01, FM Sub 02, etc. About once every six months I’ll dig through and get rid of anything that isn’t the best. I then take the best and rename the patches with unique names like “Deep Bass 9” (because lol) or “Malaria.FM” or “Whisper Sub” and so forth. Subs get ultra rhythmic when on a cross-fade loop and put it in my library.
The key here is to build and maintain a well-structured sample library.
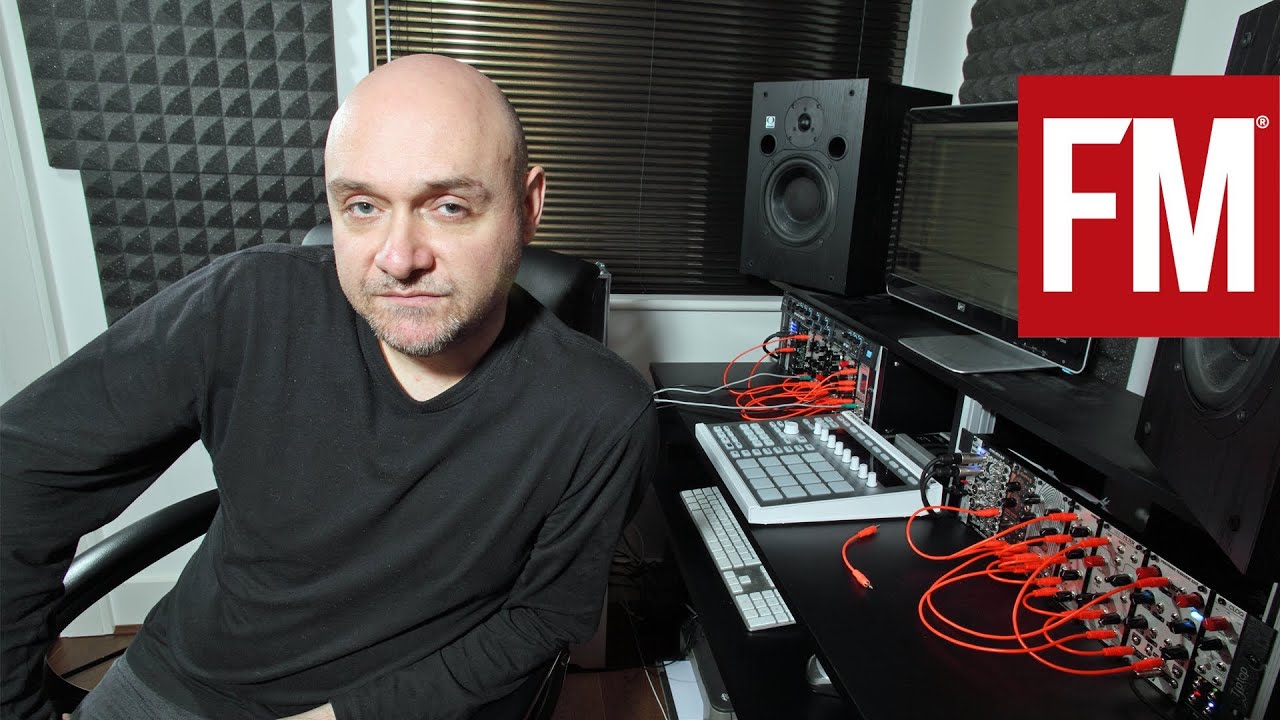
M. Geddes Gengras has been crafting modular synth music for years. Gengras gained even more attention following his collaborative album with Sun Araw and the Congos as part of the RVNG Intl.’s FRKWYS series. Gengras also uses his deft hand to make dance music
under the name Personable. Inspired by Detroit techno, it’s a different
side of his work and in the case of his new Against The Clock it’s a
thrilling thing to watch get made in real time.
[personally found this dull as dishwater, everything I don’t like about modular wankery]
Most people aren’t anywhere near discerning enough… I hear so many ropey bass drums and snares I wouldn’t even bother touching in demos…
Breakbeats off CDs? Usually sound too dull/smeared to work with.
Wonder why I seem to think of h/w synths as being like night and day against s/w?.. I’ve been doing this for 15 years, and I couldn’t get a sound I’m happy with out of Massive…
2) Make each core sound big
I was looking at my bass drum chain last night:
Now this is already two sounds layered together and sounding huge. But then I go through Dynamic Tube, PWM Distortion, Christortion, and Sony Oxford Dynamics comp, limit and warmth.
Each process is acting subtly, and has been added and tuned when I’ve needed a specific effect, either on the dry channel, or to get it sitting better in the mix - I’ve not gone straight in and put a chain of 6 dynamics/distortion plug-ins on a bassdrum out of routine.
What I get out is a sound that’s very controlled; the click, thud and boom are all pretty much in line - which often means the sound’s quite well spectrally balanced, as well as being easy to mix… It cuts through the mix when it has to, and fills the low-end out for as long as I need it to… (reverb’s also very important for giving sounds authority and space, so use a GREAT sounding reverb on an aux buss.)
All this other stuff, like trying to make a mix flat on an analyzer, or topping and tailing all the outer frequencies, or relying on limiting on the master to get it sounding fat enough, shouldn’t be necessary.
If your track sounds like you, even if it sounds “amateur”, that’s a hundred times better than sounding “pro” but generic. You’ll never stand out that way. Being yourself is WAY more important, IMO. Besides, plenty of early releases by pros sound kind of amateur.
The Two things I learned the hard way:
1- work hard. It takes a long time to get the results sometimes, but it’s worth it. After talking to a lot of pro’s, I’ve come to the conclusion that what separates the pros from the hacks is the willingness to go the long route, not talent, gear or any other thing. Hard work, plain and simple, will set you apart.
2- Believe in your sound. You may not like what you make at first. You may be tempted to copy other people’s ideas. Don’t. Trust me, you’ll end up sounding like a second rate someone-- and will not get nearly the response (i.e. success) that you’d get if you stick to your guns and keep refining your own style, no matter how weird, to the point that it stands on it’s own. I’ve known tons of guys who’ve gotten big. Tons. Many of whom aren’t particularly talented. Every one of them EVERY ONE got popular as they came into their own sound. And the guys like me who spent years learning other people’s sounds and techniques were left in the dust. Believe in your style, and rock it boldly. Fuck the naysayers, keep on with your badass self, and you will see success.
Recently I have noticed that I was just using a break to back my track sketches with, and while this sounded good in a way, it couldn’t stand up to a lot what I hear professionally, I started to get a bit disheartened that although my idea for the tunes were bang on, I’d never make my ideas presentable enough to unleash upon the world, bit too rough around the edges, drums that mightn’t have sounded too much out of place 16 years ago, but not today, anyhow… I had to identify where and why I was going wrong, and it came clear to me when muting all the drums and leaving the ‘ideas’ playing on their own.
There was nothing wrong with my ‘music’. What I am trying to get at here is what I think, is that the Drums in dnb and probably a lot of other dance music too, actually make up a huge part of what the sound quality of the tune is, and if you have crap drums it will make your whole tune sound more amateur, oh captain obvious I hear you cry, I’m meaning I reacon it can make the rest of your tune sound amateur. So, I sorted out some various really well recorded drum machine samples (to mix the old with the new, real with the synthetic), and coupled these with the breaks I was using, although taking a bit of the roughness from the breaks lower end with a touch of eq… The drum machine (909) was almost re-enforcing the breaks, giving the tune a ‘floor’, and almost instantly the other elements of the tune when played with the drums+breaks sounded a whole lot more alive and in their own space (of course I had to re mix things a little due to the new elements) than before when the drums where a little hollow and weak. The important part was the tune before even sounded good with the drums muted, and that is where I had to focus full on getting sounding right, so I think there is a lot to be said for the drum track being a lot of the quality. (imo)
Give it a few weeks, then smoke an L, listen to it again on some big speakers, act like you didn’t produce the beat, that you are a random onlooker. see what you think about it then.
Too much listening to the same track while you are producing it leads to becoming numb to the sound.
On being asked topass opinion on her teenage son’s earliest electronic endeavors made on a Casio SK5, Alex Banks’ mother closed her book, turned to him and quietly said, “This is the worst music I’ve ever heard in my life”. Luckily for us he persevered, becoming the driving force behind hardcore heroes Hyper-On Experience and, latterly, drum’n’bass banger-merchants, the EZ Rollers, both bands releasing through legendary breakbeat label Moving Shadow. Alex has been kind enough to let us take a tour of his set-up circa 1994, have a gander at some of his equations, and give us a gentle reminder that the process of taking your entire studio out and trying to make it work in public is the bedrock of the rave scene.
Why you kids don’t know how lucky you are. If you make music on a computer then you’ll know what they are capable of. You have in front of you more than was even possible when I started. Even if you had millions you could not buy all the processing my computer has because some of it hasn’t invented. Convolution reverbs, physical modeling and channel emulation – these are all new. At the press of a button I can quantize live audio, time stretch audio to fit a region and tempo map rhythms. It wasn’t always like that!
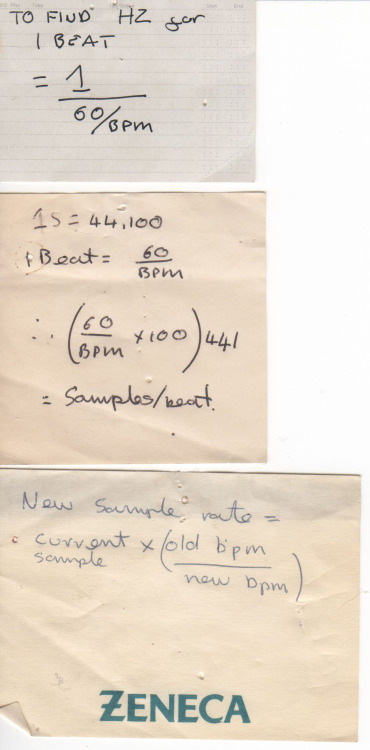
1st formula: The LFOs we had in the Akai were not midi controlled so to get the LFO to sync to a tempo I used the first formula. This will give you the frequency at a given temp to keep the LFO locked in time.
2nd formula: When you time stretch a sample in the Akai you were given the resulting sample length in seconds and the number of samples it would contain. This formula tells you how many samples it will take to match a given tempo.
3rd formula: I was given this one by Rob Playford. This one is a little more involved and it was used to mix tracks in a computer. Logic Audio in the early 90s gave you the option to change the sample rate of an audio file. The benefit of this was that if you reduced the sample rate of an audio file (complete song) it would play back faster because Logic would seek to play 44.1k sample per second. We would then mix the tracks in the computer.
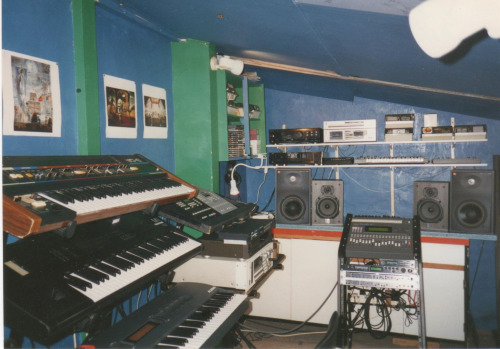
Second Photo: “The Shed at the Bottom of the Garden” c.1994.
This picture was taken just before Hyper-On ended and EZ Rollers started. We always made music standing up. Left wall: Roland Juno 6 with midi retrofit; Korg M1; Alesis something or other; 2x Alesis MMT8; Alesis datadisc; Dat machine; Akai S1000; floppy discs; ample CDs.
Back wall: hi-fi amp; tape deck; more floppys; another Dat machine; Kenton M2CV converter; Roland SH101; Roland Mc202; JBL 4208; Wharfedale Hi Fi Speakers; Yamaha 01 Digital desk; Boss SE 50 FX; EMU vintage keys; Behringer composer compressor.
About the gear:
The Juno is an absolute beast. It has the most amazing arpeggiator and I still have that synth today. It has the bigest sub-bass in the world and was used on every Hyper-On tune. It also did the bassline on Walk This Land.
The Korg M1 was pure Rave; the piano, strings and synth sounds were magical. All the “music” parts of our tunes were done on this especially the intro to Monarch of the Glen.
The Alesis synth was quite a late addition and didn’t have that many good sounds.
We bought the MMT8 because we has seen N-Joi use them. We had two so we could do drums on one and music on the other. There was a big difference with the MIDI timing depending on where in the MIDI chain you put them. The memories were dumped to the datadisc for storage.
Akai S1000: world class, period. The timing was rock solid and much better than the EMU 6400 we later got. It had so many cool features like velocity controlled sample start, individual everything for each key group and could stack four samples on one key group.
The Yamaha mixer was also a late addition and most Hyper-On tunes were written on a shitty Samik mixer.
The Boss SE50 fx unit was amazing too. The phaser, reverb and delays were really cool.
The EMU vintage keys was new and as far as I can remember was not featured heavily in Hyper-On, but EZ Rollers kaned it.
The JBLs came late to the party and most tunes were written on the Wharfdale hi-fi speakers.
Most synths in Hyper-On were analogue. We made extensive use of the Juno, 202 and SH-101. The 101 is an amazing machine and cost me £140. The Juno was £75 and the MC202 cost about £190.
The best thing about this setup was that you could dance while you made music! Instead of nodding your head in front of a computer while you drop ash on the keyboard.
In a video interview, which can be found on YouTube, Alex talks about how live shows were integral to the scene in the late 80s and early 90s. “Everywhere you went in the rave scene there were live acts in the clubs: Guru Josh, Adamski, 808 State, Altern-8, Audio One, N-Joi, The Prodigy. You know, I thought if you’re gonna do UK Hardcore,you did it live because that’s how it was presented to me. All the parties that I went to had live acts on. I saw it happen, I saw they did it on stage. I made the assumption that’s how you did it.”
And, of course, as we all know: he’s right, and Hardware in the Wild is in total agreeement.